How to use JQuery dialog as Confirm dialog?
There are quite a few articles you might have read on SimpleCodeStuffs on jQuery like jQuery Tutorial for Beginners, AJAX implementation in Servlets using jQuery and jQuery UI etc.
This example will help you if you have any one of below queries:
- How to implement “confirmation” dialog in jQuery UI dialog?
- How to use jQuery UI dialog as JavaScript confirm BOX?
- How to use JQuery dialog as Confirm dialog?
- jQuery UI Replacement for alert()
Issue: How many times did you have to code some confirmation logic on your website to ensure that your users are sure about the action they are about to perform?
A typical example is prompting the user to confirm that they are sure about deleting a record. In typical/boring JavaScript world, you would do something like this:
HTML
<input type="submit" id="delete" value="Delete" onclick="javascript:deleteConfirmation();" />
Javascript
function deleteConfirmation() {
    return confirm("Are you sure you want to delete this item?");
}
There is nothing wrong with this above code. However, it is plain. You cannot customize it with CSS make it look consistent with your site’s colour and identity.
jQuery to the rescue
jQuery UI has the solution for you. You can use the jQuery UI Dialog to present users with customized confirmation/dialog boxes as shown below.
Let’s see how to implement this
HTML
Firstly, let’s add the necessary jQuery libraries in the head section of the Jsp page.
<!DOCTYPE html>
<html>
<head>
<link rel="stylesheet" href="https://code.jquery.com/ui/1.11.2/themes/redmond/jquery-ui.css">
<script src="https://code.jquery.com/jquery-1.11.2.js"></script>
<script src="https://code.jquery.com/ui/1.11.2/jquery-ui.js"></script>
<!-- User Defined Js file -->
<script type="text/javascript">/js/confirmJs.js</script>
</head>
<body>
     <form method="post" action="delete.html">
	<input type="submit" class="button" id="Delete" name="Delete" value="Delete" />
     </form>
</body>
</html>
jQuery
File: confirmJs.js
$(document).ready(function(){
    $('#Delete').click(function(event) {
	event.preventDefault();
	var currentForm = $(this).closest('form');

	/** Create div element for delete confirmation dialog*/
	var dynamicDialog = $('<div id="conformBox">'+
	'<span class="ui-icon ui-icon-alert" style="float:left; margin:0 7px 20px 0;">'+
        '</span>Are you sure to delete the item?</div>');

	dynamicDialog.dialog({
		title : "Are you sure?",
		closeOnEscape: true,
		modal : true,

	       buttons :
			[{
				text : "Yes",
				click : function() {
					$(this).dialog("close");
					currentForm.submit();
				}
			},
			{
				text : "No",
				click : function() {
					$(this).dialog("close");
				}
			}]
	});
	return false;
    });
});
The code above instantiates the dialog box and assigns it two buttons. The”Yes”and”No”buttons. The “Yes” is responsible for submitting the form to the server.
Other jQuery tutorial from our Blog
- Ajax Cascading DropDownList in JSP & Servlet using JQuery and JSON
- Autocomplete in java web application using Jquery and JSON
Reference
Read MoreAjax Cascading DropDownList in JSP & Servlet using JQuery and JSON
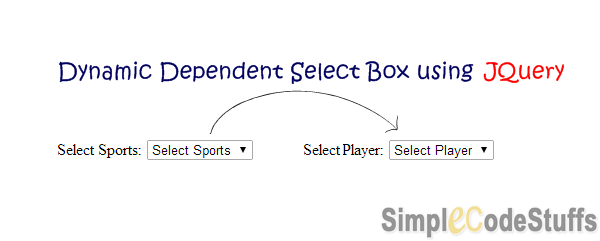
There are times in a web application where you want to populate a dropdown list based on the value of another drop down list. In this example, we will be creating a dropdown list for favorite spots and favorite player; since this scenario involves in returning complex java objects like lists, maps, etc, so I’m using JSON for this purpose.
In the article on AJAX in Servlet & jsp using JQuery I have demonstrated on returning simple object from servlet to jsp via jquery.
Library required
Project Structure
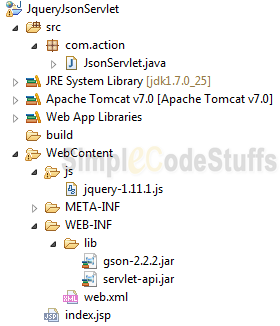
Steps done to set up our Servlet for JSON
From the browser perspective: jQuery
jQuery allows you to fire an ajax request via get or post method and expects a JSON object as a response, as described in my previous post the first and second parameter of these method are the url and a key-value pair and the third argument of get method is a function that defines what is to be done with the response that is got back from the Servlet.
Recommended reading:
Jsp Page
<html>
<head>
<title>AJAX in Servlet using JQuery and JSON</title>
<script src="js/jquery-1.11.1.js" type="text/javascript"></script>

<script>
$(document).ready(function() {

$('#sports').change(function(event) {
	var sports = $("select#sports").val();
	$.get('JsonServlet', {
		sportsName : sports
	}, function(response) {

	var select = $('#player');
	select.find('option').remove();
 	  $.each(response, function(index, value) {
	  $('<option>').val(value).text(value).appendTo(select);
      });
	});
	});
});
</script>
</head>
<body>
<h3>AJAX in Servlet using JQuery and JSON</h3>
	Select Favorite Sports:
	<select id="sports">
		<option>Select Sports</option>
		<option value="Football">Football</option>
		<option value="Cricket">Cricket</option>
	</select>
	<br /> <br />
	Select Favorite Player:
	<select id="player">
		<option>Select Player</option>
	</select>
</body>
</html>
Here jquery will fire an ajax request when the value of the first dropdown is changed(id=”sports”).
Another must read:
- AJAX Tooltip in Java Web Application using qTip2 jQuery plugin
- jQuery form validation using jQuery Validation plugin
- Pagination in Servlet and JSP using jQuery jTable plugin
From the server’s perspective: Servlet
In Servlet, I’m going to use a GSON library to convert Java objects (lists, maps etc) to JSON strings that will be parsed by JQuery in the JSP page and will be displayed on the web page and note that I have returned the response back to jsp based on the value of sports parameter which i pass to the servlet via jQuery’s get() method.
Servlet
package com.action;

import java.io.IOException;
import java.util.*;
import javax.servlet.ServletException;
import javax.servlet.http.HttpServlet;
import javax.servlet.http.HttpServletRequest;
import javax.servlet.http.HttpServletResponse;
import com.google.gson.Gson;

public class JsonServlet extends HttpServlet {

	private static final long serialVersionUID = 1L;

	protected void doGet(HttpServletRequest request,
		HttpServletResponse response) throws ServletException, IOException {

		String sportsName = request.getParameter("sportsName");
		List<String> list = new ArrayList<String>();
		String json = null;

		if (sportsName.equals("Football")) {
			list.add("Lionel Messi");
			list.add("Cristiano Ronaldo");
			list.add("David Beckham");
			list.add("Diego Maradona");
		} else if (sportsName.equals("Cricket")) {
			list.add("Sourav Ganguly");
			list.add("Sachin Tendulkar");
			list.add("Lance Klusener");
			list.add("Michael Bevan");
		} else if (sportsName.equals("Select Sports")) {
			list.add("Select Player");
		}

		json = new Gson().toJson(list);
		response.setContentType("application/json");
		response.getWriter().write(json);
	}
}
Web.xml
Servlet mapping should be done in web.xml as shown below
<welcome-file-list>
   <welcome-file>index.jsp</welcome-file>
</welcome-file-list>
<servlet>
   <servlet-name>JsonServlet</servlet-name>
   <servlet-class>com.action.JsonServlet</servlet-class>
</servlet>
<servlet-mapping>
   <servlet-name>JsonServlet</servlet-name>
   <url-pattern>/JsonServlet/*</url-pattern>
</servlet-mapping>
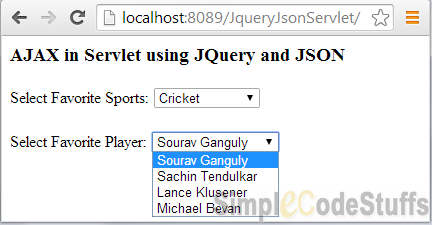
Demo
On selecting ‘Football’ in the first dropdown list
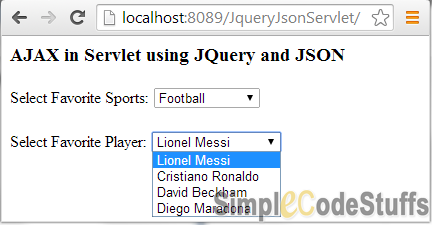
On selecting ‘Cricket’ in the first dropdown list
Other Ajax tutorial from our Blog
- AJAX implementation in Servlets using JQuery and JSON
- AngularJS Interacting with Java Servlet using JSON
- Refresh DIV Content Without Reloading Page using jQuery
Reference
Read More
Refresh DIV Content Without Reloading Page using jQuery
In my previous post, I explained about making AJAX calls to a servlet from a JSP page and updating a part of the JSP page with the response from the Servlet.
This article will help you to Refresh DIV Content Without Reloading Page using jQuery with simple html page.
<HTML>
<HEAD>
<TITLE>Refresh Div without Reloading Page</TITLE>
<script src="http://code.jquery.com/jquery-1.11.2.min.js"></script>
<script>
	$(document).ready(function() {
		setInterval(function() {
			var randomnumber=Math.floor(Math.random()*100)
			$('#show').text('Random Number ==> '+randomnumber);
		}, 2000);
	});
</script>
</HEAD>
<BODY>
<div align="center">
<h3>Refresh DIV Content Without Reloading Page using jQuery</h3>
<br>
Demo by Mohaideen - @ <a href="" target="_blank">SimpleCodeStuffs</a>
<br>
<br>
<div id="show" style="padding:10px;border-radius:9px;border:3px solid #EE371A;width:50%;">
This div will get refreshed for every 2 seconds..!
</div>
</div>

</BODY>
</HTML>
Another must read article
- AngularJS Interacting with Java Servlet using JSON
- AJAX Tooltip in Java Web Application using qTip2 jQuery plugin
- jQuery form validation using jQuery Validation plugin
- jQuery Tutorial for Beginners
Read More
AJAX Tooltip in Java Web Application using qTip2 jQuery plugin
This article discusses AJAX Tooltip in Java Web Application using qTip2 jQuery plugin. This library is used for creating Asynchronous display of tool tip.
Library required
Project Structure
Now Create a dynamic web project in Eclipse with following folder structure
Set up from browser perspective: jQuery qTip2
Jsp form which ToolTip via ajax
<!DOCTYPE html>
<html>
<head>
<link rel="stylesheet" href="./css/jquery.qtip.min.css" type="text/css" media="screen"/>
<title>AJAX Tool tip using qTip2 jQuery plugin</title>
<style>
.qtip-content {
	border: 1px solid grey;
}

.student-name {
	color: blue;
	cursor: pointer;
}

.name-style {
	font-weight: bold;
	font-size: 14px
}

.style {
	font-weight: bold;
}
</style>
</head>
<body>
<h2>Qtip2 Demo With Ajax Call</h2>

<h3>Student Details</h3>
	<p >
		<span class="student-name" id="1" >Mohaideen</span> <br>
		<span class="student-name" id="2">Ameer</span> <br>
		<span class="student-name" id="3">Badru</span> <br>
		<span class="student-name" id="4">Prabhu</span>
	</p>

<script src="./js/jquery-1.9.0.min.js"></script>
<script src="./js/jquery.qtip.min.js"></script>
<script>
$(document).ready(function(){

	$('span.student-name').each(function()
	{
		$(this).qtip(
		{
		content: {
		text: '<img  src="./image/loading.gif" alt="Loading..." />',

		ajax: {
			url: './Qtip2Servlet',
			type: 'GET',
			data: {id  :$(this).attr('id')},
			dataType: 'json',

			success: function(data, status) {
		 	   var content = new Array();
			   content.push("<div class='name-style'>"+data.name+"</div><br>");
			   content.push("<div class='style'>Mark : "+data.mark+"</div>");
			   content.push("<div class='style'>Roll : "+data.id+"</div>");
			   content.push("<div class='style'>Address : "+data.address+"</div>");
			   content.push("<div class='style'>Phone : "+data.phoneNo+"</div>");
			   this.set('content.text', content.join(""));
			}
			}
			},

			position: {
				at: 'bottom center',
				my: 'top center',
				viewport: $(window),
				effect: true
			},

			show: {
				event: 'mouseover',
				solo: true
			},

			hide: 'unfocus',
			style: {
				classes: 'qtip-light'
			}
		})
	})
});
</script>
</body>
</html>
The JQuery code written on the head section of the jsp page is responsible for the AJAX call made to the servlet.
Another must read:
jQuery form validation using jQuery Validation plugin
jQuery Tutorial for Beginners
From the server’s perspective: Servlet
In Servlet, I’m going to use a GSON library to convert Java objects to JSON strings that will be parsed by JQuery in the JSP page and will be displayed on the web page and note that I have returned the response back to jsp based on the value of ‘id’ parameter which i pass to the servlet via jQuery’s ajax() method.
Servlet implementation
package servlet;

import java.io.IOException;

import javax.servlet.ServletException;
import javax.servlet.http.HttpServlet;
import javax.servlet.http.HttpServletRequest;
import javax.servlet.http.HttpServletResponse;
import model.Student;
import service.StudentService;
import com.google.gson.Gson;

public class Qtip2StudentServlet extends HttpServlet {
	private static final long serialVersionUID = 1L;

	protected void doGet(HttpServletRequest request,
  	    HttpServletResponse response) throws ServletException, IOException {

		String id = request.getParameter("id");
		Student student = StudentService.getStudentWithId(id);

		String json = new Gson().toJson(student);
		response.setContentType("application/json");
		response.getWriter().write(json);
	}
}
Model class
package model;

public class Student {

	private String name;
	private String mark;
	private String id;
	private String address;
	private String phoneNo;

	public String getName() {
		return name;
	}

	public String getMark() {
		return mark;
	}

	public String getId() {
		return id;
	}

	public String getAddress() {
		return address;
	}

	public String getPhoneNo() {
		return phoneNo;
	}

	public void setName(String name) {
		this.name = name;
	}

	public void setMark(String mark) {
		this.mark = mark;
	}

	public void setId(String id) {
		this.id = id;
	}

	public void setAddress(String address) {
		this.address = address;
	}

	public void setPhoneNo(String phoneNo) {
		this.phoneNo = phoneNo;
	}
}
Business class
This Business Service class which provides static data using model class.
package service;

import java.util.ArrayList;
import java.util.List;

import model.Student;

public class StudentService {

	public static List<Student> getStudentList() {

		List<Student> listOfStudent = new ArrayList<Student>();

		Student s1 = new Student();
		s1.setName("Mohaideen");
		s1.setMark("98");
		s1.setAddress("Chennai India");
		s1.setPhoneNo("+91- 123456789");
		s1.setId("1");
		listOfStudent.add(s1);

		Student s2 = new Student();
		s2.setName("Ameer");
		s2.setMark("90");
		s2.setAddress("Kolkatta India");
		s2.setPhoneNo("+91- 542789");
		s2.setId("2");
		listOfStudent.add(s2);

		Student s3 = new Student();
		s3.setName("Badru");
		s3.setMark("97");
		s3.setAddress("Bangalore India");
		s3.setPhoneNo("+91- 123456");
		s3.setId("3");
		listOfStudent.add(s3);

		Student s4 = new Student();
		s4.setName("Prabhu");
		s4.setMark("88");
		s4.setAddress("Vizag India");
		s4.setPhoneNo("+91- 6789012");
		s4.setId("4");
		listOfStudent.add(s4);

		return listOfStudent;

	}

	public static Student getStudentWithId(String id) {

		List<Student> listOfStudent = getStudentList();

		Student targetStudent = null;

		for (Student student : listOfStudent) {

			if (student.getId().equalsIgnoreCase(id)) {
				targetStudent = student;
				break;
			} else {
				continue;
			}
		}
		return targetStudent;
	}
}
web.xml
Make sure you have done servlet mapping properly in web.xml file. An example of this is given below,
<servlet>
	<servlet-name>Qtip2Servlet</servlet-name>
	<servlet-class>servlet.Qtip2StudentServlet</servlet-class>
</servlet>
<servlet-mapping>
	<servlet-name>Qtip2Servlet</servlet-name>
	<url-pattern>/Qtip2Servlet</url-pattern>
</servlet-mapping>
<welcome-file-list>
	<welcome-file>index.jsp</welcome-file>
</welcome-file-list>
Demo
While loading tooltip from server side, a simple loading image gets displayed as below.
Once the data is loaded from server side via ajax, that data is displayed in the browser as shown below.

jQuery Tutorial for Beginners

In this article we are going to take a look at introduction to jQuery, what it is, what is does and why we should use in our website.
If you are looking to perform Ajax operations in your website with lot of cool effects on it and you are not completely familiar with java script, then jQuery is a very easy and flexible way to integrate thing like effects, Ajax, animation and so on.
A Little Bit About jQuery
jQuery is Open-Source JavaScript library that contains variety of functions and other functionality that allows you to do the effects in an easier way and it is widely used for the below advantages.
- DOM manipulation
- AJAX
- Animations
- Extensibility through plugins
Why should you use it?
- Easy to learn! It uses CSS syntax for selection
- Its tiny 93.5 KB, it loads really fast in most browsers.
- Documented jquery.com & Supported forum.jquery.com
- Cross browser compatibility: IE 6+, FF 2+ and with most major browsers
- It is the most used JavaScript library on the web today
- 39% of all sites that use JavaScript use jQuery.
How to use jQuery
In order to use jQuery you need to load it, you can either include it locally on your own server:
- <script src=”/js/jquery.js”>
Or use one of the CDN’s made available:
Introduction to DOM?
The DOM is everything you write in your html documents, images, css, all your tags, everything. When a web page is loaded, the browser creates a Document Object Model of the page. The HTML DOM model is constructed as a tree of Objects.
Example: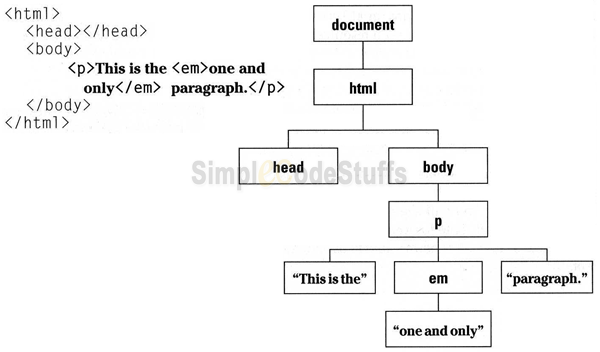
The DOM is a mess. There are a million different ways to accomplish things within it and many different doctypes and uppercase and lowercase are allowed attributes that sometimes need quotes, and other times don’t. JQuery is coded around all those inconsistencies.
JQuery can modify the DOM, but it can’t do so until the DOM is ready. So how can I be sure my code runs at DOM ready?
Wrap all your jQuery code with the document ready function.
$(document).ready(function(){
// all jQuery code goes here
});
Load Scripts at the Bottom
Problem:
When scripts are downloading they block everything else in almost all browsers!
Solution:
Best practice: The DOM is loaded top to bottom, so include your scripts at the bottom of your page so they don’t interrupt page content downloads.
And BOOM! Goes The Dynamite!!!
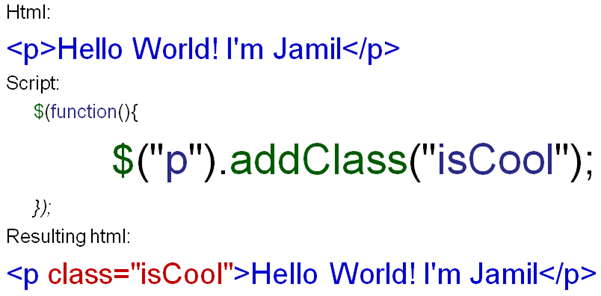
Break It Down!
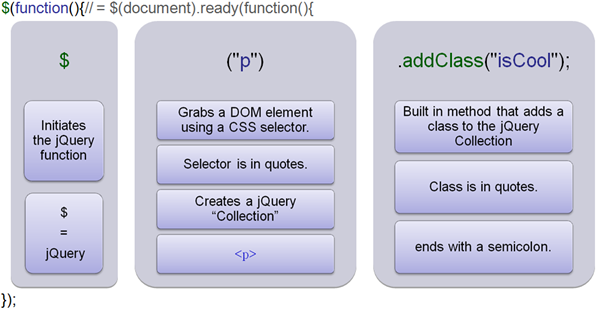
Basic jQuery Selectors
$("div"); // selects all HTML div elements
$("#myElement"); // selects one HTML element with ID "myElement"
$(".myClass"); // selects HTML elements with class "myClass"
$("p#myElement"); // selects paragraph elements with ID "myElement"
$("ul li a.navigation"); // selects anchors with class "navigation" that are nested in list items
$("p > a"); // selects anchors that are direct children of paragraphs
$("input[type=text]"); // selects inputs that have specified type
$("a:first"); // selects the first anchor on the page
$("p:odd"); // selects all odd numbered paragraphs
$("li:first-child"); // every list item that's first child in a list
Manipulating and Accessing CSS Class Names
JQuery allows you to easily add, remove, and toggle CSS classes, which comes in handy for a variety of practical uses. Here are the different syntaxes for accomplishing this:
$("div").addClass("content"); // adds class "content" to all <div> elements
$("div").removeClass("content"); // removes class "content" from all <div> elements
$("div").toggleClass("content"); // toggles the class "content" on all <div> elements
//(adds it if it doesn't exist, and removes it if it does)
You can also check to see if a selected element has a particular CSS class, and then run some code if it does. You would check this using an if statement. Here is an example:
if ($("#myElement").hasClass("content")) {
// do something here
}
You could also check a set of elements (instead of just one), and the result would return “true” if any one of the elements contained the class.
Manipulating CSS Styles with jQuery
CSS styles can be added to elements easily using jQuery, and it’s done in a cross-browser fashion. Here are some examples to demonstrate this:
$("p").css("width", "400px"); // adds a width to all paragraphs
$("#myElement").css("color", "blue") // makes text color blue on element #myElement
$("ul").css("border", "solid 1px #ccc") // adds a border to all lists
Hide and Seek
$("div").show();
Before:
<div style="display:none;">
After:
<div style="display:block;">
Similar to .show() there is a hide method as well.
$("div").hide();
Before:
<div style="display:block;">
After:
<div style="display:none;">
You Can Chain Most Methods Together
$("p").addClass("sophisticated").show();
Getters and Setters
Dual Purpose Methods

jQuery Getter
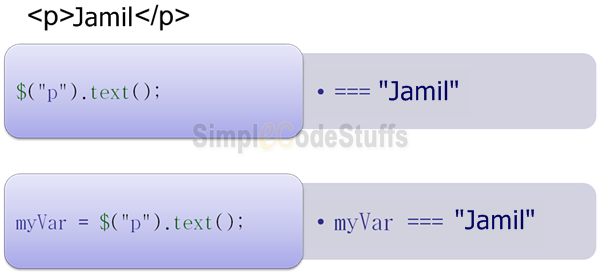
jQuery Setters

Dealing with Events in jQuery
Specific event handlers can be established using the following code:
$("#myID").click(function() {
// do something here
// when element with id="myID" is clicked is clicked
});
The code inside function() will only run when an anchor is clicked. Some other common events you might use in jQuery include: blur, focus, hover, keydown, load, mousemove, resize, scroll, submit, select.
I have explained about Ajax implementation in a click event via java web application using jQuery in the article here. In that example I have returned a simple java object from server side to and update in the jsp page via Ajax, Now inorder to return a complex java object from server side I have used JSON for this purpose. Please refer the article here to learn on how to implement Ajax in java web application using jQuery to return complex objects.

Jquery UI
jQuery UI is a curated set of user interface interactions, effects, widgets, and themes built on top of the jQuery JavaScript Library. Whether you’re building highly interactive web applications or you just need to add a date picker to a form control, jQuery UI is the perfect choice.
Refer jQueryUI.com to learn more on jQueryUi.
Jquery Plugins
“If you want to create an animation, effect or UI component, chances are pretty good that someone has done your work for you already.”
Refer plugins.jquery.com to know more about wide variety of jQuery plugins.
Listed are the few of jQuery plugins which I have explored and found to be greatly useful.
- jTable plugin
- jQuery.AjaxFileUpload plugin
- jQuery.form.js
- jQuery DataTables plugin
- jQGrid
- YUI3 jquery chart plugin
- jQuery Validation plugin
- qTip2 – The jQuery tooltip plugin
Keep in mind that this tutorial is just a bunch of straightforward code examples and brief explanations for beginners who want to avoid all the jargon and complexities. But I still highly recommend that all beginners get past this stuff by means of a good book, or by using the jQuery documentation. Thanks for reading.
Pagination in Struts 2 using jQuery jTable plugin
This is the third article on jQuery jTable plugin in Struts 2 that describes on how to implement pagination feature to do server side paging in struts 2 using the JQuery jTable plugin and here I have not explained about how to setup jTable plugin in struts 2. So If you have not read my previous articles “Setting up JQuery jTable plugin in Struts 2” and “Ajax based curd operation in Struts 2 using JQuery jTables plugin”, I will recommend that you read that article first because first one explains how you can integrate the JTable plugin in Struts 2 application and second article explains on how to implement ajax based curd operation. This article will assume that the code for the integration of the jQuery JTable plugin is implemented, and only the code required for implementing pagination in Struts 2 using jTable is explained here.
Setup
As described above, the prerequisite for this code is that you integrate the jQuery jTable plugin into the Struts 2. You can find detailed instructions here, at JQuery jTable plugin in Struts 2, so now I am going to take the sample application I created for explaining AJAX based crud operations in jTable plugin and continue to implement paging for that application.
1. Download sample application from here and import the project in eclipse
2. Follow the steps in this article here to create table in database.
Steps to enable Paging:
From the browser perspective: jTable
To enable paging, paging option must set to true. You can also set pageSize option (default value is 10) in jQuery Script code.
$('#StudentTableContainer').jtable({
    //...
    paging: true, //Set paging enabled
    pageSize: 3, //Set page size
    actions: {
        //...
    },
    fields: {
        //...
    }
});
Note: pageSize sets the initial number of records to be displayed per page.
Modified Jsp page
<!DOCTYPE html>
<html>
<head>
<title>jTable Pagination in Java Web Applications</title>

<!-- Include one of jTable styles. -->
<link href="css/metro/blue/jtable.css" rel="stylesheet" type="text/css" />
<link href="css/jquery-ui-1.10.3.custom.css" rel="stylesheet" type="text/css" />

<!-- Include jTable script file. -->
<script src="js/jquery-1.8.2.js" type="text/javascript"></script>
<script src="js/jquery-ui-1.10.3.custom.js" type="text/javascript"></script>
<script src="js/jquery.jtable.js" type="text/javascript"></script>

<script type="text/javascript">
$(document).ready(function() {
	$('#StudentTableContainer').jtable({
		title : 'Students List',
		paging : true, //Enable paging
		pageSize : 3, //Set page size (default: 10)
		actions : {
			listAction : 'listAction',
			createAction : 'createAction',
			updateAction : 'updateAction',
			deleteAction : 'deleteAction'
		},
		fields : {
         		studentId : {
			title : 'Student Id',
				width : '30%',
				key : true,
				list : true,
				edit : false,
				create : true
			},
			name : {
				title : 'Name',
				width : '30%',
				edit : true
			},
			department : {
				title : 'Department',
				width : '30%',
				edit : true
			},
			emailId : {
				title : 'Email',
				width : '20%',
				edit : true
			}
		}
	});
	$('#StudentTableContainer').jtable('load');
});
</script>

</head>
<body>
<div style="text-align: center;">
	<h3>jTable Pagination in Java Web Applications</h3>
	<div id="StudentTableContainer"></div>
</div>
</body>
</html>
From the server’s perspective: Servlet
If paging is enabled, jTable sends two query string parameters to the server on listAction AJAX call:
• jtStartIndex: Start index of records for current page.
• jtPageSize: Count of maximum expected records.
And it expects additional information from server:
• TotalRecordCount: Total count of records.
In our previous example the url specified in the ‘listAction‘ option has business logic to fetch all records from database. Now in order to handle pagination this ‘listAction’ option should fetch only a part of records for each page, So handle this there are two changes that has to be done in the server side .
1. Modify oracle query to fetch only a subset of records based on the jtStartIndex and jtPageSize.
Since these values are sent along with the request as string parameters by jTable so add following member variable in struts 2 action class and create getters and setters for the same
// Holds Start Page Index
private int jtStartIndex;
// Hold records to be displayed per Page
private int jtPageSize;
2. As mentioned above, jTable need TotalRecordCount to be present in the json response, For which add a member variable totalRecordCount in struts 2 action class and create getters and setters for the same.
Now replace the list method in action class with the below code,
public String list() {
try {
	// Fetch Data from Student Table
	records = dao.getAllStudents(jtStartIndex, jtPageSize);
	// Get Total Record Count for Pagination
	totalRecordCount = dao.getStudentCount();
	result = "OK";
} catch (Exception e) {
	result = "ERROR";
	message = e.getMessage();
}
return Action.SUCCESS;
}
Changes made at Dao class
Add below two methods in ‘CrudDao.java’ file
1. Method to get the count of total number of records in the result set.
public int getStudentCount()
{
int count=0;
try
{
	Statement stmt = dbConnection.createStatement();
	ResultSet rs = stmt.executeQuery("SELECT COUNT(*) AS COUNT FROM STUDENT");
	while (rs.next())
	{
		count=rs.getInt("COUNT");
	}
}
catch (SQLException e)
{
	System.err.println(e.getMessage());
}
return count;
}
2. In order to return only a subset of records according to the page offset (jtStartIndex and jtPageSize), oracle query should be modified as follows,
In case of Oracle database:
“SELECT * from (Select M.*, Rownum R from STUDENT M) where r > ” + < jtStartIndex> +” and r <= "+< jtStartIndex + jtPageSize >;
In case of MySql database:
select * from STUDENT limit <jtStartIndex>,<jtPageSize>
Now modify getAllUsers in CurdDao.java using below code
public List<Student> getAllStudents(int startPageIndex, int recordsPerPage) {
List<Student> students = new ArrayList<Student>();
int range = startPageIndex+recordsPerPage;
String query="SELECT * from (Select M.*, Rownum R From STUDENT M) where r > " + startPageIndex +" and r <= "+range;
try
{
	Statement stmt = dbConnection.createStatement();
	ResultSet rs = stmt.executeQuery(query);
	while (rs.next())
	{
		Student student = new Student();
		student.setStudentId(rs.getInt("STUDENTID"));
		student.setName(rs.getString("NAME"));
		student.setDepartment(rs.getString("DEPARTMENT"));
		student.setEmailId(rs.getString("EMAIL"));
		students.add(student);
	}
}
catch (SQLException e)
{
	System.err.println(e.getMessage());
}
return students;
}
This function returns only a subset of records according to the page offset (jtStartIndex and jtPageSize).
Now on running the application, with the above changes, the final demo looks as shown below:


Reference
jTable official website
AJAX based CRUD tables using ASP.NET MVC 3 and jTable jQuery plug-in
