Transfer property(SOAPUI)
Property Transfer TestSteps are used to transfer properties between TestSteps(Requests) and their containing TestCase, TestSuite and Project. They are extremely useful in a number of situations, especially when properties containing XML are involved.
This tutorial involves,
- Extracting a value from an XML message
- Write a value into an XML message
- Transfer complex XML content between properties
** Update – Complete SoapUi Tutorials now available here
Follow the steps below to transfer properties between TestSteps inside a testsuite.
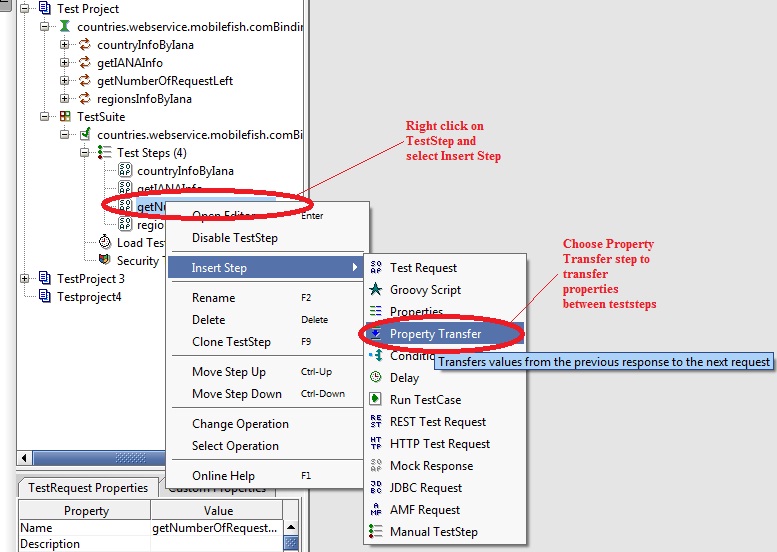
Step 1: To transfer property within the request, right click on a teststep and select Insert step–> Property Transfer from the dropdown menu.
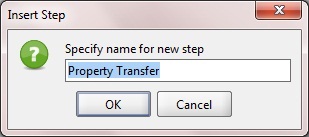
Step 2: In the Insert Step window, enter a userdefined name for the property transfer teststep and click OK.
Step 3:
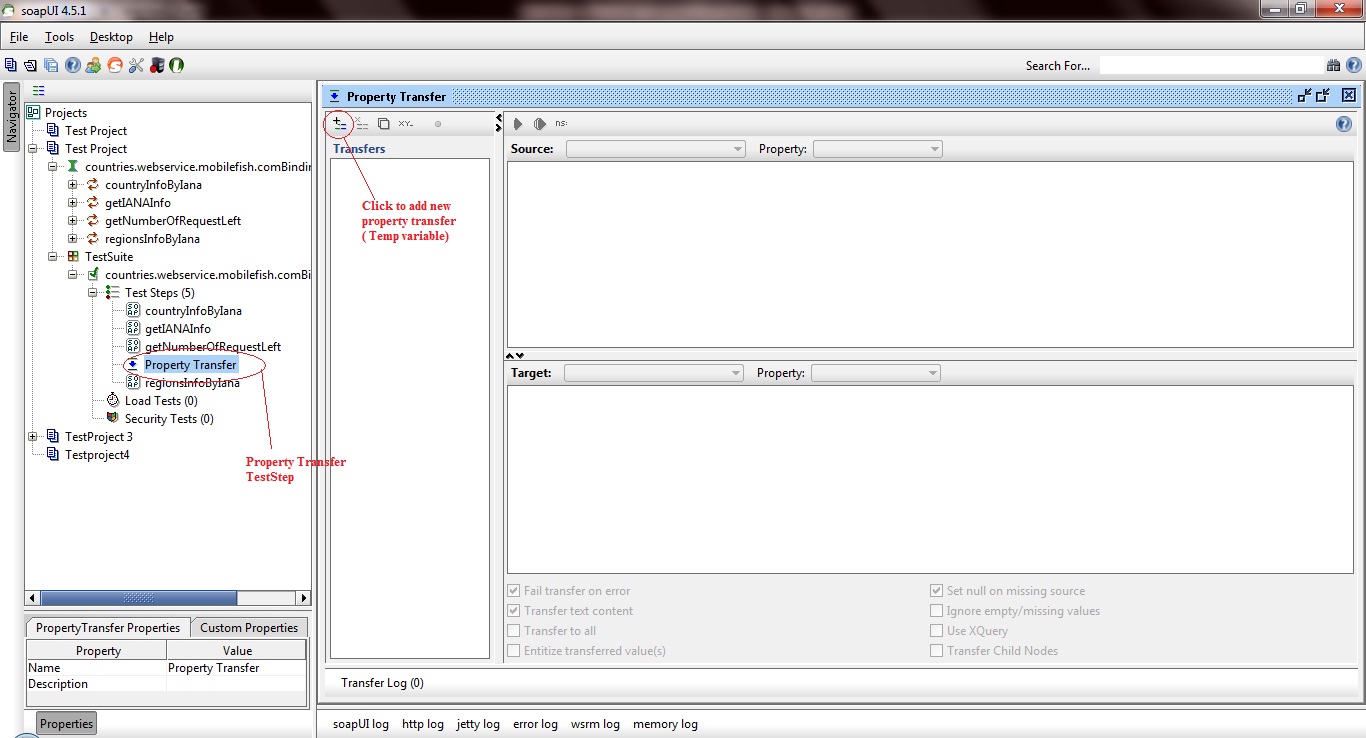
Click on ![]() icon to add new property transfer to the property transfer editor window.
icon to add new property transfer to the property transfer editor window.
Step 4:
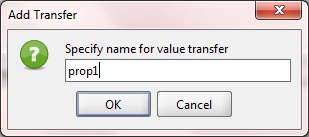
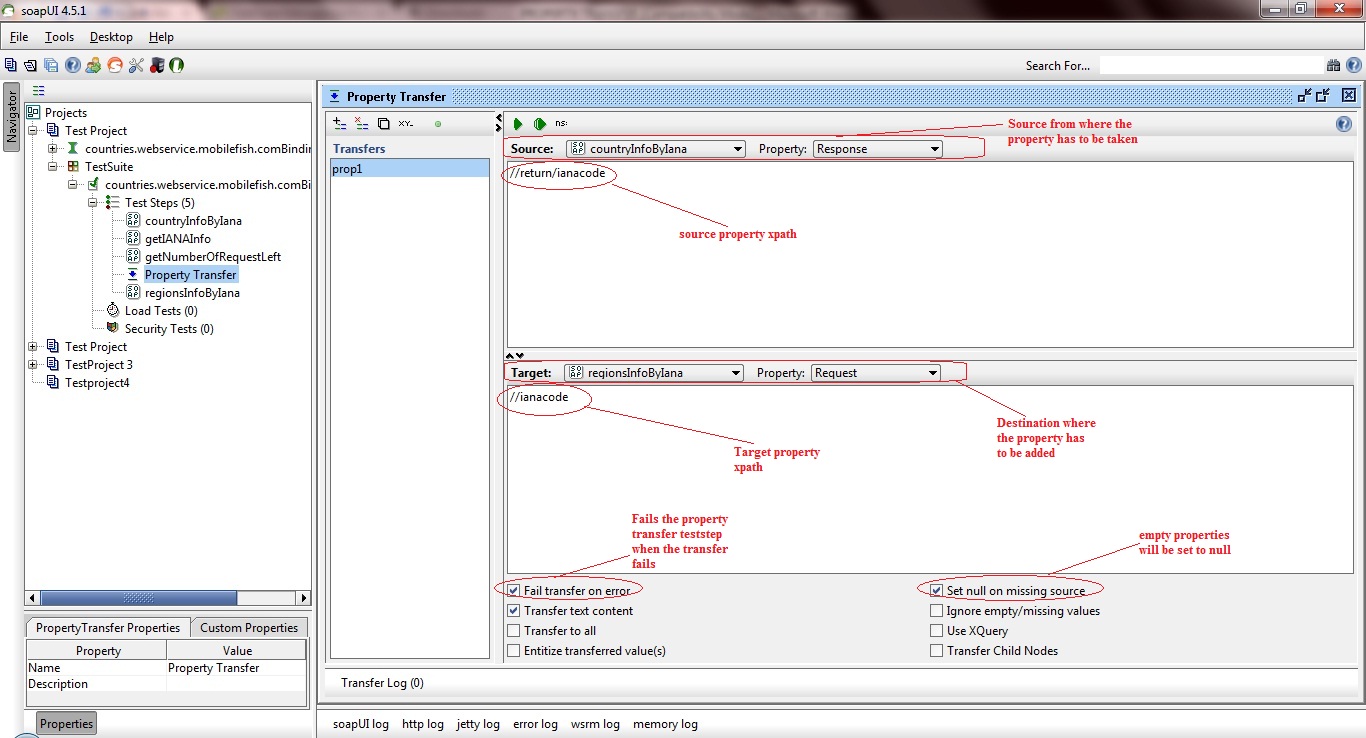
Enter property transfer name and click OK in the Add transfer to add the property to the property transfer editor window as shown in the image below.
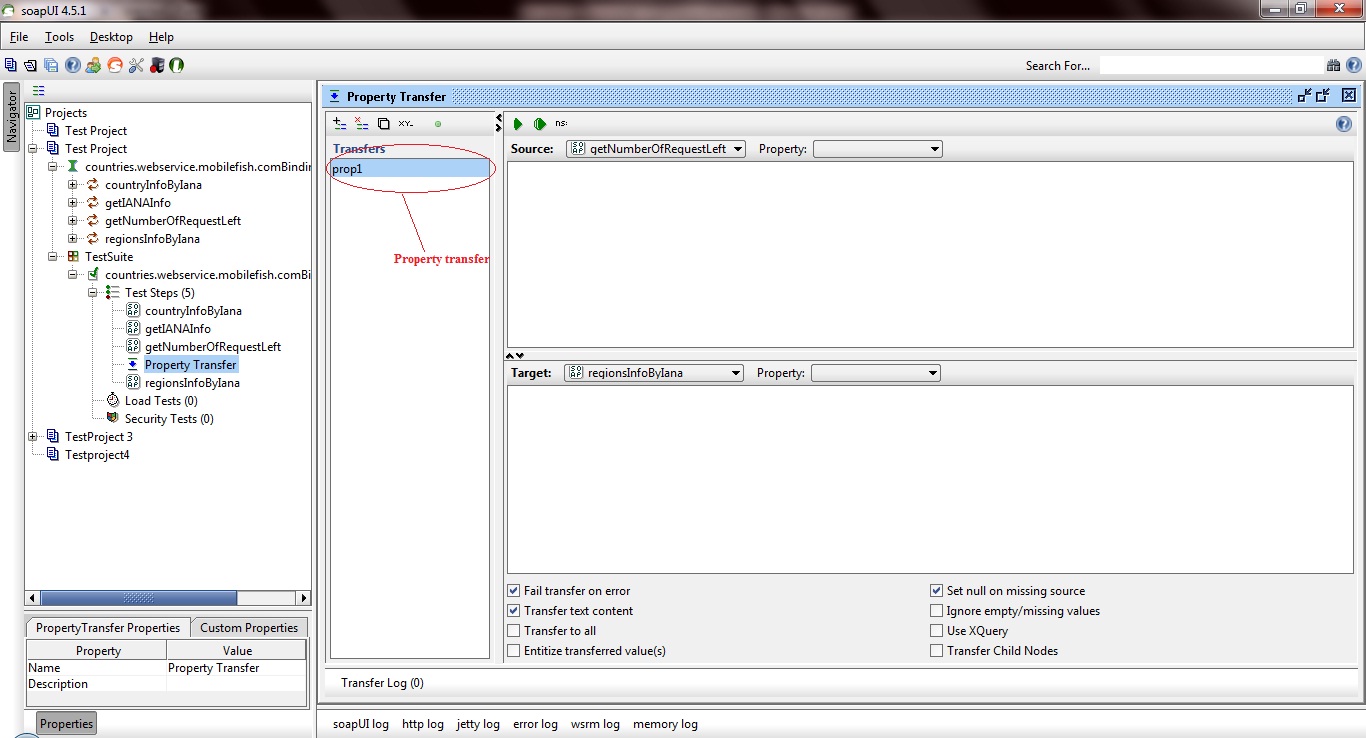
The various tabs and options available in the property transfer editor window are as follows.
- The Source area at the top specifies the source property and optional XPath for the transfer
- The Target area under that specifies the target property and optional XPath for the transfer
- The area below that holds different configuration options set on a transfer to transfer level.
- The Transfer Log at the bottom shows the latest executed transfers while the window was open and their actual transferred values.
The available configuration options can drastically change what is transferred and their respective is defined as:
- Fail transfer on error – The transfer step will fail in case any errors happen while attempting to perform the transfer
- Transfer text content – Only text content will be transferred. No structural elements will be preserved
- Transfer to all – The matched values will be transferred to all the target locations in case there are several that matches
- Entitize transferred values – The values will have certain characters for example ampersand (“&”) replaced with it’s corresponding character entity value (“&”)
- Set null on missing source – The target will be set to null in case the source resource is missing. This means that if the target already has a value it will be lost
- Ignore empty/missing values – This means that if the matched value of the source is empty or missing it will be ignored and the target value left untouched
- Use XQuery – SoapUI will assume that the source is XQuery rather than the default XPath when trying to extract the source values
- Transfer child nodes – SoapUI will not attempt any textual extraction from the matched source node but rather pick the children of the matched node and thus preserving the subtree XML structure
Step 4:
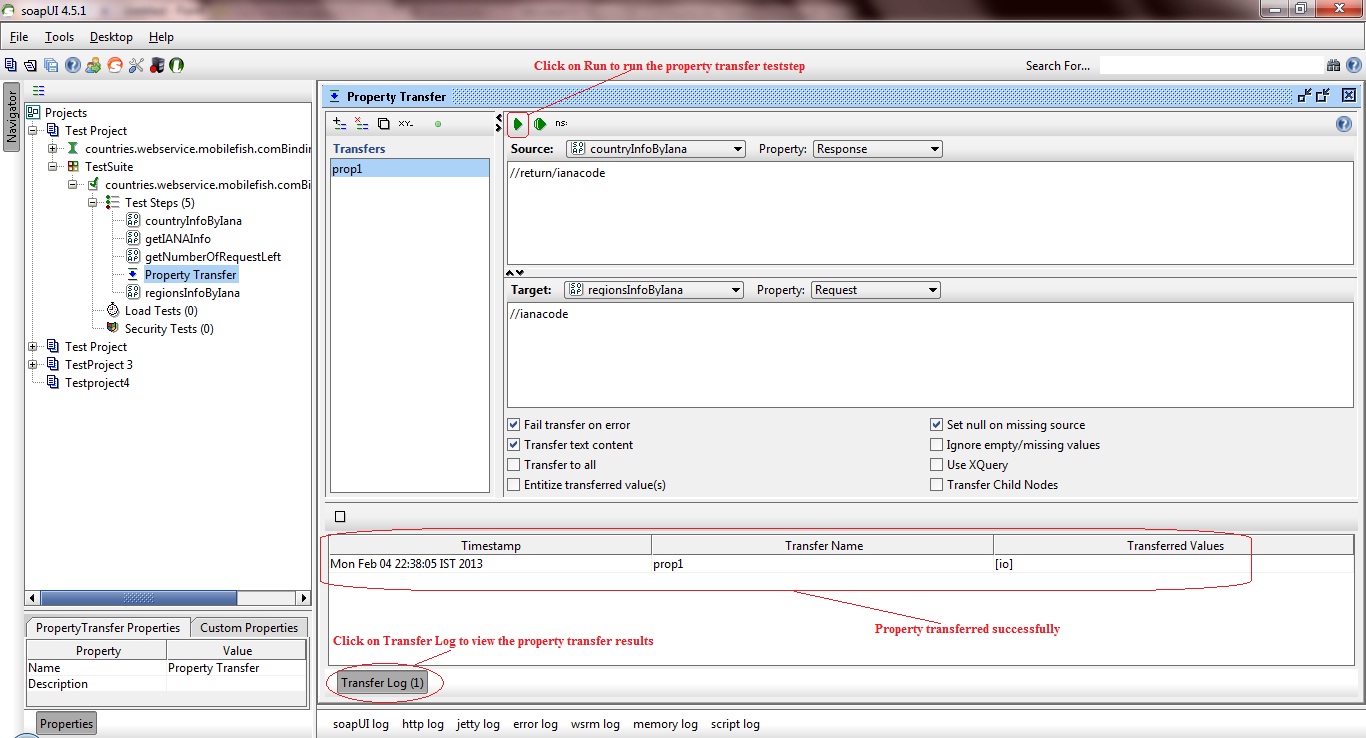
Now in the property transfer teststep editor window, choose the source property and the target property by providing the xpath as shown in the image below.
Step 5:
Now click on run ![]() icon to test whether the property is getting transferred successfully. The result can be viewed in the transfer log as shown in the image below.
icon to test whether the property is getting transferred successfully. The result can be viewed in the transfer log as shown in the image below.
Note: Before running the property transfer editor, check if the source property (xpath) is not empty/null. Otherwise the property value while property transfer will be null (since Set null for missing source option is checked).
Running the testcase to check property transfer:
Now, let’s run the testcase to check whether the property is getting transferred successfully between the requests. Follow the steps discussed below to verify property transfer is successful.
Step 1:
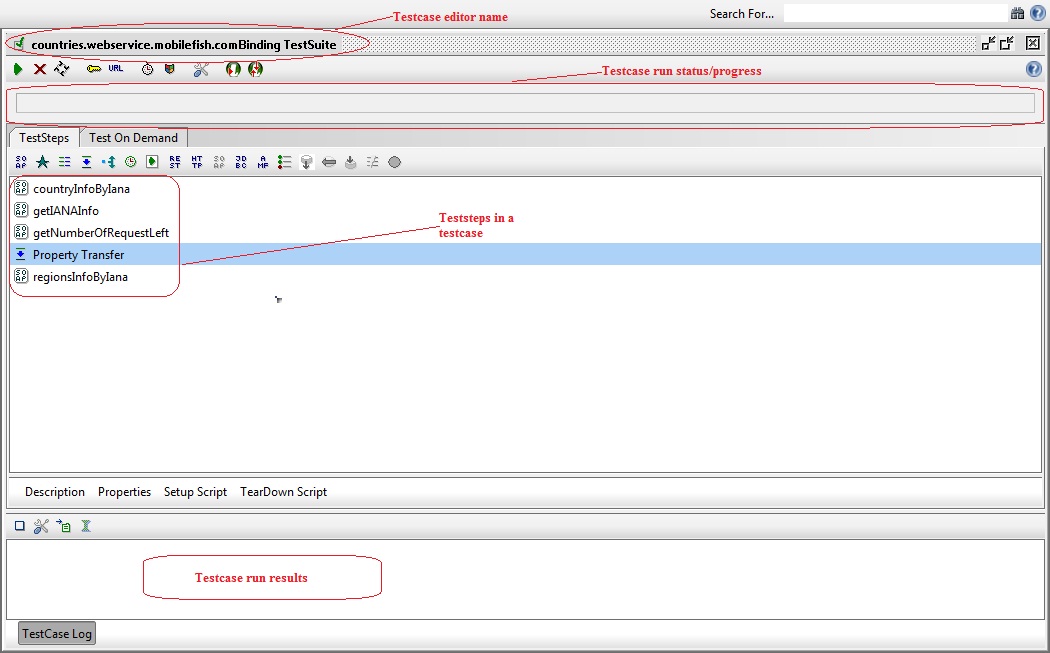
Now click on the testcase name to run the teststeps available in the testcase in the editor window as shown in the image below.
Step 2:
Click on run![]() icon to execute the property transfer in the testcase.
icon to execute the property transfer in the testcase.
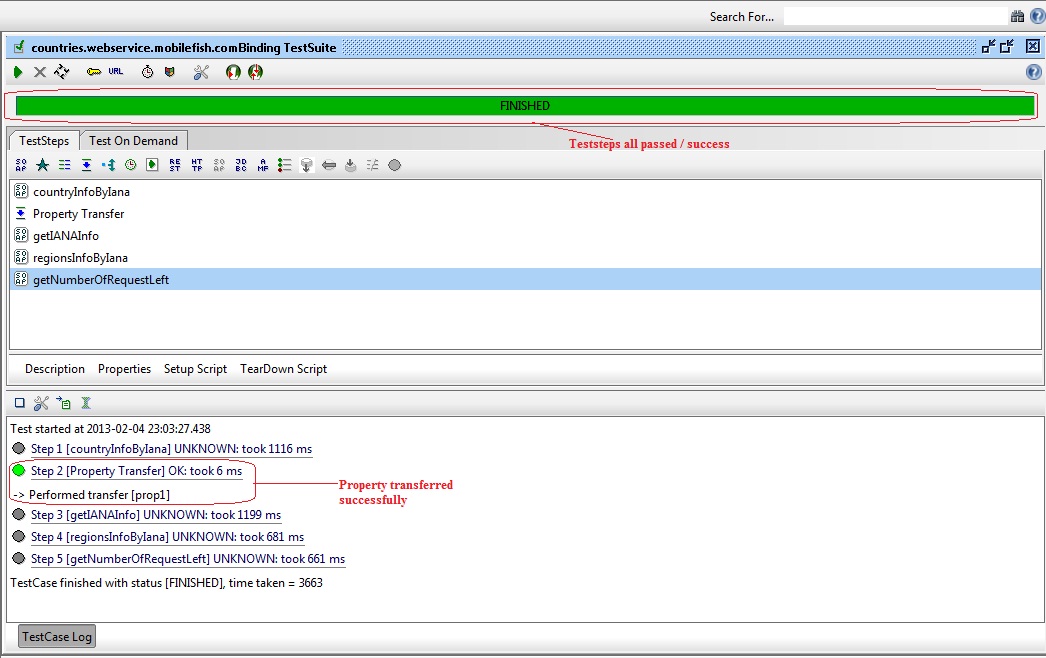
Thus properties can be transferred between requests (from xml content) at testcase level.
Read MoreHow To Create Analog And Digital Clocks in an Android Application using Eclipse:
In this tutorial, you will be learning How to display Toggle Button in an activity
Here you go!!!!
How To Create Linear Layout in an Android Application using Eclipse

In this Tutorial, you will Learn
1.How to display an activity in Linear layout
2.What are the various types of linear layouts available
Before creating an android application using Eclipse, let us see some of the key terms involved while developing this application.
Key terms involved in this project:
Layout: A layout defines the visual structure for a user interface, such as the UI for an activity or app widget. You can declare a layout in two ways:
- Declare UI elements in XML
- Instantiate layout elements at runtime.
Linear Layout: Linear Layout is a view group that aligns all children in a single direction, vertically or horizontally. You can specify the layout direction with the android:orientation attribute. All children of a Linear Layout are stacked one after the other, so that a vertical list will only have one child per row, no matter how wide they are, and a horizontal list will only be one row high (the height of the tallest child, plus padding). A Linear Layout respects margins between children and the gravity (right, center, or left alignment) of each child.
** UPDATE: Android Complete tutorial now available here.
Layout Weight: Linear Layout also supports assigning a weight to individual children with the android:layout_weight attribute. This attribute assigns an “importance” value to a view in terms of how much space is should occupy on the screen. A larger weight value allows it to expand to fill any remaining space in the parent view.
The tutorial is about how to display an activity in linear layout(both horizontal and vertical).
This project is developed in Eclipse 4.2 (Juno) and tested with Android 2.2
If you are new to new to android application project, to create a new project in Eclipse refer Creation of Android Project.
Coding:
Now let’s go to the coding section. This project requires following files.
Source Code:
- Linearlayout.java (Activity in horizontal linearlayout)
- Verticallayout.java (Activity in vertical linearlayout)
Activity Files:
- activity_linearlayout.xml – horizontal linearlayout activity
- activity_verticallayout.xml – vertical linearlayout activity
res – Values:
- strings.xml – strings available in both horizontal and vertical layouts
Manifest file:
- AndroidManifest.xml - common to both horizontal and vertical layouts
Here are the coding for the above files.
Linearlayout.java:
package com.example.linearlayout; // Linearlayout package for horizontal layout
import android.os.Bundle; // A mapping from String values to various Parcelable types.
import android.app.Activity; // Required to create an activity.
import android.view.Menu; // Interface for managing the items in a menu.
public class Linearlayout extends Activity { // all classes extends activity
	@Override
	protected void onCreate(Bundle savedInstanceState) { // Create an activity/ screen
		super.onCreate(savedInstanceState);
// displays activity linearlayout in horizontal layout when app starts
		setContentView(R.layout.activity_linearlayout);
	}
	@Override
	public boolean onCreateOptionsMenu(Menu menu) { // Menu settings
		// Inflate the menu; this adds items to the action bar if it is present.
		getMenuInflater().inflate(R.menu.activity_linearlayout, menu);
		return true;
	}
}
activity_linearlayout.xml:
<?xml version="1.0" encoding="utf-8"?>
<!-Setting the linear layout with horizontal orientation-->

<LinearLayout xmlns:android="http://schemas.android.com/apk/res/android"
    android:layout_width="fill_parent"
    android:layout_height="fill_parent"
    android:orientation="horizontal" >
 <!-- Button1 -->

    <Button
        android:id="@+id/button1"
        android:layout_width="wrap_content"
        android:layout_height="wrap_content"
        android:text="Simple" />
<!-- Button2 -->

    <Button
        android:id="@+id/button2"
        android:layout_width="wrap_content"
       android:layout_height="wrap_content"
        android:text="Codestuffs" />
  <!-- Button3 -->

    <Button
        android:id="@+id/button3"
        android:layout_width="0dip"
        android:layout_height="0dip"
        android:text=".com"
        android:layout_weight="1"/>

</LinearLayout>
activity_verticallayout.xml:
<?xml version="1.0" encoding="utf-8"?>
<!-Setting the linear layout with vertical orientation-->

<LinearLayout xmlns:android="http://schemas.android.com/apk/res/android"
    android:layout_width="fill_parent"
    android:layout_height="fill_parent"
    android:orientation="vertical" >

<!-- Button1 -->

    <Button
        android:id="@+id/button1"
        android:layout_width="wrap_content"
        android:layout_height="wrap_content"
        android:text="Simple" />
<!-- Button2 -->

    <Button
        android:id="@+id/button2"
        android:layout_width="wrap_content"
       android:layout_height="wrap_content"
        android:text="Codestuffs" />
  <!-- Button3 -->

    <Button
        android:id="@+id/button3"
        android:layout_width="0dip"
        android:layout_height="0dip"
        android:text=".com"
        android:layout_weight="1"/>

</LinearLayout>
Menu : activity_linearlayout.xml
<menu xmlns:android="http://schemas.android.com/apk/res/android" >

    <item
        android:id="@+id/menu_settings"
        android:orderInCategory="100"
        android:title="@string/menu_settings"/>

</menu>
Menu : activity_verticallayout.xml
<menu xmlns:android="http://schemas.android.com/apk/res/android" >

    <item
        android:id="@+id/menu_settings2"
        android:orderInCategory="100"
        android:title="@string/menu_settings2"/>

</menu>
AndroidManifest.xml:
<?xml version="1.0" encoding="utf-8"?>
<manifest xmlns:android="http://schemas.android.com/apk/res/android"
    package="com.example.linearlayout"
    android:versionCode="1"
    android:versionName="1.0" >

    <uses-sdk
        android:minSdkVersion="8"
        android:targetSdkVersion="8" />

    <application
        android:allowBackup="true"
        android:icon="@drawable/ic_launcher"
        android:label="@string/app_name"
        android:theme="@style/AppTheme" >
        <activity
            android:name="com.example.linearlayout.Linearlayout"
            android:label="@string/app_name" >
            <intent-filter>
                <action android:name="android.intent.action.MAIN" />

                <category android:name="android.intent.category.LAUNCHER" />
            </intent-filter>
        </activity>
    </application>

     <application
        android:allowBackup="true"
        android:icon="@drawable/ic_launcher"
        android:label="@string/app_name2"
        android:theme="@style/AppTheme" >
        <activity
            android:name="com.example.linearlayout.verticallayout"
            android:label="@string/app_name2" >
            <intent-filter>
                <action android:name="android.intent.action.MAIN" />

                <category android:name="android.intent.category.LAUNCHER" />
            </intent-filter>
        </activity>
    </application>

</manifest>
strings.xml:
<?xml version="1.0" encoding="utf-8"?>
<resources>

    <! -- Application Name1 -->
    <string name="app_name">Linearlayout - Horizontal</string>
<! -- Application Name2 -->
    <string name="app_name2">Linearlayout - Vertical</string>

  <string name="menu_settings">Settings</string>
    <string name="menu_settings2">Settings</string>

</resources>
Styles. xml:
<resources>
<! -- specify properties such as height, padding, font color, font size, background color -->


    <!--
        Base application theme, dependent on API level. This theme is replaced
        by AppBaseTheme from res/values-vXX/styles.xml on newer devices.
    -->
    <style name="AppBaseTheme" parent="android:Theme.Light">
        <!--
            Theme customizations available in newer API levels can go in
            res/values-vXX/styles.xml, while customizations related to
            backward-compatibility can go here.
        -->
    </style>

    <!-- Application theme. -->
    <style name="AppTheme" parent="AppBaseTheme">
        <!-- All customizations that are NOT specific to a particular API-level can go here. -->
    </style>

</resources>
Run the android application:
Android applications can be run on the android devices. You can either connect a hardware to the system to test the application or you can use the android virtual devices (AVD) Manager to create/manage the virtual devices running on emulator to run the application.
If you are new to create a Android Virtual Device (AVD), refer Creating Android Virtual Device.
To run the application/ project, Build your project using Project ->Build Project.
This will show errors in Console window at the bottom of the working area in case your project contains.
If your build is successful, Run your application using Run -> Run or Press Ctrl +F11.
Upon running the application, the emulator will be launched which displays the AVD on your screen.
You can see your app with the image set during the android project creation in AVD.
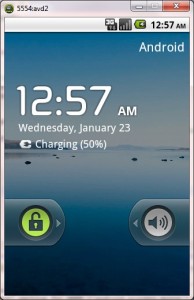
Upon running the application, the emulator will be launched with the selected/ available AVD created on your screen.
To test your application, unlock the screen and double click on your app.
You can see your app with the image set during the android project creation in AVD.
Horizontal Activity:
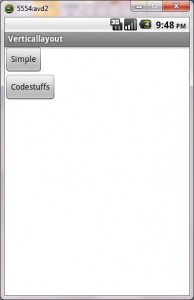
Vertical Layout:
Thus the android application project is executed successfully.
Read MoreSpring – Java config file providing the configuration metadata


In the previous example, we observed the working of spring at its simplest . The main part of injecting the dependency value here, was taken up by the Configuration metadata xml file (Beans.xml). Another option supported by spring is to set this information through a java configuration file.
** UPDATE: Spring Complete tutorial now available here.
1 Create the POJO HelloWorld.java
File : HelloWorld.java
package com.simpleCodeStuffs;

public class HelloWorld {

public HelloWorld(){

System.out.println("In constructor of HelloWorld");

}

private String message;

public void setMessage(String message){

this.message  = message;

}

public void getMessage(){

System.out.println("Your Message : " + message);

}

}
Step 2 :
Previously, the metadata was provided through xml (Beans.xml)using various xml tags. Now let us define the java configuration equivalent of the same which makes use of annotations to provide the configuration data. Create a new class JavaConfig under the same package.
File :JavaConfig.java
package com.simpleCodeStuffs;

import org.springframework.context.annotation.Bean;

import org.springframework.context.annotation.Configuration;

@Configuration

public class JavaConfig {

@Bean(name="helloWorld")

public HelloWorld helloWorld(){

HelloWorld bean = new HelloWorld();

System.out.println("helloWorld bean through Java Config");

bean.setMessage("JavaConfig msg- SimpleCodeStuffs");

return bean;

}

}
| Annotation | Description |
| @Configuration | States that this class is used by Spring to provide bean definition. An application may have one or more classes with @Configuration |
| @Beanattributes :- a) Name b) initMethodName c) destroyMethodName d) Scope | It is a method level annotation. The return value of the methods annotated with @Bean is registered as a bean by BeanFactory.a) This is used to explicitly mention the name of the bean. By default the bean name is same as the method name.b) The method to be called for the bean initialization c) The method to be called at the end of the bean lifecycle. d) Defines the scope of bean. By default it is taken as âsingletonâ.
|
| @import | The functionality is similar to <import resource=â..â/> in xml file. |
This can be done as follows
File : JavaConfig.java
@Configuration

public class JavaConfig {

@Bean

public Candidate candidate() {

return new Candidate(address());

}

@Bean

public Address address() {

return new Address ();

}

}
In this case, Address is an attribute inside Candidate. Hence the value for the Address bean is injected by passing a call to address() bean method from Candidate’s bean method.
3. Create a main class for running the above example
File : MainJavaConfig.java
package com.simpleCodeStuffs;

import org.springframework.context.ApplicationContext;

import org.springframework.context.annotation.AnnotationConfigApplicationContext;

public class MainJavaConfig {

public static void main(String args[]){

ApplicationContext context =
           new AnnotationConfigApplicationContext(JavaConfig.class);

HelloWorld obj = (HelloWorld) context.getBean("helloWorld");

obj.getMessage();

}

}
4 : Demo
Run the Main class. The output is as follows
Spring Environment Setup

In this section, you will see about setting up Eclipse IDE to get started with our code development works, installing the latest JDK a, setting the environment variables and adding the required JARs for running of some basic Spring based applications.
Step 1. Download and install Eclipse IDE of your preference. For Eclipse IDE installation instructions, you can refer here.
eclipse IDE installation instructions
Step 2. Download the latest JDK, as per your system requirements from here
Step 3. Set the environment variables in your system
Right click on MyComputer -> Properties. On the left side pane, choose Advanced System Settings.
** UPDATE: Spring Complete tutorial now available here.
A window opens up. Choose Advanced tab on this and click on Environment Variables button
Environment Variable window opens up. In the system variables, select New.
Provide the variable name – JdkHome(this name can differ)
variable value – C:Program FilesJavajdk1.7.0_11bin . The provided location is the path where the bin folder under JDK is present.
Click ok
Now your eclipse is well set.
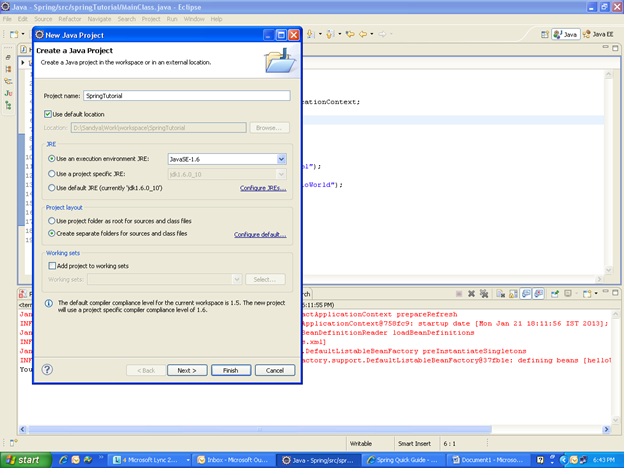
Step 4 : Now that your Integrated Development Environment(IDE) is ready. Let us create a project.
Select File ->New->Java project
Provide an appropriate name.
Step 5 : Download the required JAR files. Find below the list of JAR files that will be made use of, over various stages of this tutorial.
Spring Basic jars
- antlr-runtime-3.0.1
- org.springframework.aop-3.1.0.M2
- org.springframework.asm-3.1.0.M2
- org.springframework.aspects-3.1.0.M2
- org.springframework.beans-3.1.0.M2
- org.springframework.context.support-3.1.0.M2
- org.springframework.context-3.1.0.M2
- org.springframework.core-3.1.0.M2
- org.springframework.expression-3.1.0.M2
- commons-logging-1.1.1
- cglib-2.2
- aopalliance
- asm-3.3.1
- aspectjweaver
Step 6 : Right click on your project. Select Build path->Configure Build path.
On the libraries tab, choose Add external libraries. Here browse and add the list of JARs downloaded as per the previous step. Click ok
Thats it! You are now all set to start trying out hands-on exercises using spring !! Read More

